- Name of
the Tool: Museum Box
- URL of the
Tool: http://museumbox.e2bn.org/

- Please
select the one, primary category for this tool: Learning Organization Tool
- Please describe this tool in your own words in about 250 words.
Museum Box is a web based tool that allows the students to chose a
topic and host information about that topic in different boxes. Each box will
have a label (subject) and inside the box there are cubes.
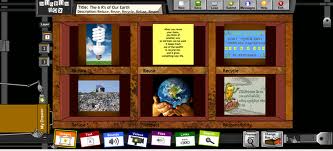
On each of the six sides of the cube information about the box
title can be saved. This could be text, audio file, video clip, internet link,…etc.
The students will be creating different cube projects to be shared with others.
When the cube project is finished and submitted it has to approved by the
school administrator then published on the web. When you click on the box you
could chose to read, hear or watch any of these files to know about this box project.
You could do the same thing with each box in the museum box.

- Try using
the Tool (you may need to sign up for a free or trial account) so that you
will learn how it works and what its capabilities are - and so that you
will be able to answer the following questions.
The account has to be a school’s account. I tried to sign up twice but
it did not work and I got a nessage there was a temporary technical problem.
- What do
you need to know before using this tool? (What skills do you need to
have?)
Basic computer and internet skills. No special skills needed.
- What do
you need to have before using this tool? (Resources)
Computer or
mobile device with internet access is the only thing needed for teachers and
students.
8. How do you use this tool? (Write the
basic steps using a numbered list)
1- The teacher should sign up with the school’s
name.
2- The students login and chose a title for the
box
3- The students click on cubes and chose each of
the six sides of cube to add, text, links, audio or video files using the corresponding tabs at the bottom of the screen.
4- The students submit project.
5- The administrator will either approve and
publish project or return it to students with comments for modification and editing.
9. If applicable, please create an
example with this tool and either embed in your blog or submit the URL.
I tried to sign up but the website seem to have changed its login system or is having technical difficulties.
10. Please describe a
scenario of how you might use this tool in a teaching environment.
This tool is ideal for K12 teaching environment. The teacher may
ask the students to prepare projects. They may work individually or even better
in teams. A topic for a project can be
assigned by teacher (e.g. Ancient Egypt). The students will enter the title,
chose the boxes and number of layers, give a name to each cube ( e.g. Agriculture,
Religion, politics, …) The students will
start working on the project completing the six sides of the each cube. They
can then submit this. The teacher can publish it or return it to students with
comments to be modified or edited. Once complete, submitted and published it
can be shared with others. The project designing and collaborative learning are
two important aspects of Box Museum that should enhance the students’ learning.
11. What are the advantages of using this tool in a teaching
environment?
-
Cost efficiency
-
Lack of equipment needed
- Simple concept and easy to use (if it works properly)
12. What are the
disadvantages of using this tool in a teaching environment?
- Lack of assessment by the tool.
- Technical difficulties (also mentioned by others on some reviews)
- Geared mainly toward K12 (school account,
cubes, boxes, …)
No comments:
Post a Comment